
Sacroiliac (SI) joint pain and dysfunction is a common source of low back and hip pain that can often be overlooked. SI joint pain can be quite debilitating, as the SI joint is the core structure of the musculoskeletal system that acts as the body’s shock absorption system.
Many individuals suffering from SI joint pain will complain of difficulty with simple daily activities that load the joint, like walking up and down stairs or bending at the waist. This means you can forget about lunges and other exercises in the gym!
So, how can you keep your clients training?
Most online articles for SI joint pain suggest stretches for the lower back and glutes. While these might help relieve pain, they fail to get at the root of the problem.
And, while manual therapy can help people feel better, it fails to GET people better if it is not integrated into a more complete strategy.
Why?
Stretches and manual therapy do not change the movement-based contributions of SI joint pain and dysfunction. What you need is an exercise-based strategy that targets the SI joint directly. On the plus side, an SI joint pain exercise strategy can also help with other lower back and hip conditions.
Enjoyed this video? Make sure you subscribe to our YouTube channel!
THE SI JOINT: WHAT YOU NEED TO KNOW
Keystone model
One of the most contentious issues in SI joint research has been the mobility of the joint. The most popularly accepted model of SI joint biomechanics is the keystone model.
The keystone model suggests that the wedge shape of the sacrum fit into the accommodating shape formed between the two ilia like a keystone in a Roman arch.
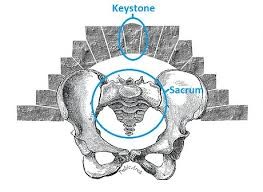
Within this model, compression or locking of the pelvis by drawing the ilia into the sacrum is essential to provide stability of the SIJ.
This self-locking comes in part from the form closure of the keystone structure, and from force closure. Force closure refers to the dynamic action of the muscles and fascia creating compression or resistance to opening of the SI joint beyond normal range of motion.
Suspensory model
A seemingly less recognized model of SI joint function is the suspensory model, which is based on the concept of ligamentous suspension and mobility of the SI joint.
The suspensory model suggests that the sacrum hangs from the posterior interosseous ligaments with weight loading. This would mean it actually functions as the reverse of a keystone by hanging more deeply between the ilia with increased weight loading.
This ligamentous suspension is important in allowing movement of the sacrum through range of motion at the SI joint.

Now, we could go deep into the « which model is right » rabbit hole (and if you do want to go there, Serola Biomechanics is an excellent source for everything SI joint).
But my experience has shown me that understanding both concepts and making decisions based on the mobility-stability continuum is what provides the best outcomes.
We know that stability is NOT the opposite of mobility and that
stability is not defined by reduced motion
in a functional approach.
Like any other joints, the SI joint needs a combination of mobility and stability that is balanced. This fine balance is what your SI joint movement intervention needs to focus on.
But how do you restore that fine balance? Your strategy must include the following 3 essential steps:
WITHOUT MOVEMENT, THERE IS NO POTENTIAL FOR MOVEMENT
STEP ONE – MOBILIZE
The SI joint does not have a ton of range of motion when compared to some of the other joints in our body. However, the small amplitude movements between the sacrum and the ilium are subtle but important, and if lost, can contribute to SI joint pain and dysfunction.
While stretches for the lower back and glutes are commonly proposed as SI joint pain exercises, they do not target the SI joint directly.
On the other hand, SI joint-specific stretches can be quite pain relieving.
In fact, starting with an SI joint stretch can decrease pain and apprehension and help set the stage for the subsequent steps of the exercise strategy.
Here is a simple but effective SI joint stretch that can be held for 60-90 seconds. A towel can be used if the client is unable to grasp the foot. The orientation of this stretch (and any other SI joint stretch) should be to bring the knee towards the same side armpit.
Another helpful element to restore movement of the SI joint are directed mobilizations, such as side lying mobilizations or pelvic clocks.
MAKE SURE TO WATCH THE MAIN VIDEO OF THIS ARTICLE TO SEE HOW THESE EXERCISES ARE PERFORMED.
Now that we have created the subtle but very important space need for SI joint mobility, we need to populate that space with movement so that we can create awareness and stability.
But what is stability exactly?
STABILITY IS THE ABILITY TO VOLUNTARILY LIMIT MOBILITY
STEP TWO – STABILIZE
Stability is not defined by reduced motion. However, stability involves the ability to voluntarily limit mobility to create bracing or stiffness.
While Step 1 is to create space and promote movement of the SI joint, the key in Step 2 is to stabilize the SI joint and avoid excessive stress on the ligaments. Care must be taken to hold the joint within its normal range of motion.

The sacrum moves on the ilium, a movement that is coupled with pelvic tilting. Nutation is a forward nod of the sacrum which occurs with posterior tilting of the pelvis. Counternutation, or backward nod, occurs with anterior tilting of the pelvis.
From a practical perspective, this means that excessive movement into anterior or posterior tilt results in excessive movement of the sacrum. This has the potential to take the SI joint beyond its normal range of motion and stress the ligaments.
As such,
the key to stabilizing the SI joint lies in very familiar territory for trainers and therapists: pelvic tilting
Specifically, we are looking to maintain pelvic stability during movement, which means avoiding excessive anterior and/or posterior, particularly under load.
This involves balancing the force couple between posterior pelvic tilters and anterior pelvic tilters.
Band march variations are a great way to achieve this. MAKE SURE YOU WATCH THE MAIN VIDEO OF THIS ARTICLE FOR MORE PELVIC STABILITY EXERCISES.
Once the fine balance of mobility and stability has been achieved, the next step is to make sure the SI joint can tolerate load. This is the step that most trainers and therapists overlook the importance of.
STOP TELLING YOUR CLIENTS TO STOP TRAINING
STEP THREE – LOAD
The SI joint must be able to move freely and control movement. But as the center of the body’s shock absorption system, it must be capable of accepting and distributing load and it does not go at this alone.
Modifying load, rather than restricting it altogether, provides much better outcomes. Exercises that target this connection, as well as exercises that resemble gait, are great to increase the SI joint’s load tolerance.
The muscles that act on the SI joint play an important role in deceleration, which helps to distribute loading forces. We need to continue to train these muscles to fulfill their deceleration role.
Force closure is generated by muscles with a fiber direction perpendicular to the sacroiliac joint is if often termed a “self-bracing” mechanism.
A common example is the anatomical connections of the gluteus maximus and the contralateral thoracolumbar facia (think lats), also known as the functional back line or posterior oblique sling, which provides a significant force closure mechanism.
MAKE SURE YOU WATCH THE MAIN VIDEO OF THIS ARTICLE FOR SI JOINT STRENGTHENING EXERCISES.
Here is an example of a load progression targeting the glute max and opposite lats:
EXERCISE IS OWNERSHIP
While stretches and manual therapy might help with some SI joint pain relief, alone they do not create changes in the way your clients move and how that can contribute to misalignment and dysfunction.
Changing movement and breaking the cycle of pain and dysfunction requires structure, repetition, frequency, attention…Rehab is Training!
This 3-step exercise strategy not only targets the SI joint specifically but helps restore the finely tuned balance of mobility and stability so crucial to optimal function.
And while restoring mobility and stability is a huge step in the right direction, we must remember to ensure strength in the continuum of care. The precise selection of exercises that allow you to overload the SI joint safely and with sufficient intensity to maintain an adaptation are key to help your clients not only feel better but get better!
References:
GIBBONS, John. Functional anatomy of the PELVIS and the sacroiliac joint, North Atlantic Books, 2017.
Dontigny, R. L. (2011). A detailed and critical biomechanical analysis of the sacroiliac joints and relevant kinesiology: The implications for lumbopelvic function and dysfunction. Journal of Prolotherapy, 3(1), 561-567. doi:DOI: 10.1016/B978-044310178-6.50020-7
Vleeming, A., Schuenke, M., Masi, A., Carreiro, J., Danneels, L., & Willard, F. (2012). The sacroiliac joint: An overview of its anatomy, function and potential clinical implications. Journal of Anatomy, 221, 537-567. doi:doi: 10.1111/j.1469-7580.2012.01564.x

Mai-Linh Dovan M.SC., CAT(C)
Certified Athletic Therapist
Founder of Rehab-U


… [Trackback]
[…] Information on that Topic: rehab-u.com/a-3-step-exercise-strategy-for-sacroiliac-si-joint-pain/ […]
… [Trackback]
[…] Read More on that Topic: rehab-u.com/a-3-step-exercise-strategy-for-sacroiliac-si-joint-pain/ […]
… [Trackback]
[…] There you can find 10104 additional Information to that Topic: rehab-u.com/a-3-step-exercise-strategy-for-sacroiliac-si-joint-pain/ […]
… [Trackback]
[…] Read More Information here on that Topic: rehab-u.com/a-3-step-exercise-strategy-for-sacroiliac-si-joint-pain/ […]
… [Trackback]
[…] Read More here to that Topic: rehab-u.com/a-3-step-exercise-strategy-for-sacroiliac-si-joint-pain/ […]
… [Trackback]
[…] Read More to that Topic: rehab-u.com/a-3-step-exercise-strategy-for-sacroiliac-si-joint-pain/ […]
… [Trackback]
[…] Read More on that Topic: rehab-u.com/a-3-step-exercise-strategy-for-sacroiliac-si-joint-pain/ […]
… [Trackback]
[…] Info to that Topic: rehab-u.com/a-3-step-exercise-strategy-for-sacroiliac-si-joint-pain/ […]
… [Trackback]
[…] There you can find 95575 more Info to that Topic: rehab-u.com/a-3-step-exercise-strategy-for-sacroiliac-si-joint-pain/ […]
… [Trackback]
[…] Read More Info here to that Topic: rehab-u.com/a-3-step-exercise-strategy-for-sacroiliac-si-joint-pain/ […]
… [Trackback]
[…] Read More on that Topic: rehab-u.com/a-3-step-exercise-strategy-for-sacroiliac-si-joint-pain/ […]
… [Trackback]
[…] Here you can find 93066 additional Information on that Topic: rehab-u.com/a-3-step-exercise-strategy-for-sacroiliac-si-joint-pain/ […]
… [Trackback]
[…] Find More Information here on that Topic: rehab-u.com/a-3-step-exercise-strategy-for-sacroiliac-si-joint-pain/ […]
… [Trackback]
[…] Read More on to that Topic: rehab-u.com/a-3-step-exercise-strategy-for-sacroiliac-si-joint-pain/ […]
… [Trackback]
[…] Find More Information here to that Topic: rehab-u.com/a-3-step-exercise-strategy-for-sacroiliac-si-joint-pain/ […]
… [Trackback]
[…] Read More on that Topic: rehab-u.com/a-3-step-exercise-strategy-for-sacroiliac-si-joint-pain/ […]
… [Trackback]
[…] Here you will find 80624 more Information on that Topic: rehab-u.com/a-3-step-exercise-strategy-for-sacroiliac-si-joint-pain/ […]
… [Trackback]
[…] Find More Information here to that Topic: rehab-u.com/a-3-step-exercise-strategy-for-sacroiliac-si-joint-pain/ […]
… [Trackback]
[…] There you can find 18242 additional Info to that Topic: rehab-u.com/a-3-step-exercise-strategy-for-sacroiliac-si-joint-pain/ […]
… [Trackback]
[…] Read More Information here to that Topic: rehab-u.com/a-3-step-exercise-strategy-for-sacroiliac-si-joint-pain/ […]
… [Trackback]
[…] Read More Info here on that Topic: rehab-u.com/a-3-step-exercise-strategy-for-sacroiliac-si-joint-pain/ […]
… [Trackback]
[…] Read More to that Topic: rehab-u.com/a-3-step-exercise-strategy-for-sacroiliac-si-joint-pain/ […]
… [Trackback]
[…] Info to that Topic: rehab-u.com/a-3-step-exercise-strategy-for-sacroiliac-si-joint-pain/ […]
… [Trackback]
[…] Info on that Topic: rehab-u.com/a-3-step-exercise-strategy-for-sacroiliac-si-joint-pain/ […]
… [Trackback]
[…] Info on that Topic: rehab-u.com/a-3-step-exercise-strategy-for-sacroiliac-si-joint-pain/ […]
… [Trackback]
[…] Info on that Topic: rehab-u.com/a-3-step-exercise-strategy-for-sacroiliac-si-joint-pain/ […]
… [Trackback]
[…] Read More to that Topic: rehab-u.com/a-3-step-exercise-strategy-for-sacroiliac-si-joint-pain/ […]
… [Trackback]
[…] Read More on to that Topic: rehab-u.com/a-3-step-exercise-strategy-for-sacroiliac-si-joint-pain/ […]
… [Trackback]
[…] Read More on that Topic: rehab-u.com/a-3-step-exercise-strategy-for-sacroiliac-si-joint-pain/ […]
… [Trackback]
[…] Find More on that Topic: rehab-u.com/a-3-step-exercise-strategy-for-sacroiliac-si-joint-pain/ […]